转载自:在 PVE 使用 Debian 云镜像创建虚拟机 - 我的笔记
在 PVE 使用 Debian 云镜像创建虚拟机

在 PVE 中使用 Debian 云镜像创建虚拟机,并将其转换为模板,以便为批量创建统一配置的 Debian 12 系统提供基础。
Debian 官方提供的云镜像
Debian 官方 提供以下版本云镜像
- azure:针对 Microsoft Azure 环境进行了优化
- ec2:针对 Amazon EC2 进行了优化
- generic:应该在任何使用 cloud-init 的环境中运行,例如 OpenStack、DigitalOcean 和裸机
- genericcloud:类似于通用。应该在任何虚拟化环境中运行。通过排除物理硬件的驱动程序而小于“通用”
- nocloud:主要用于测试构建过程本身。没有安装 cloud-init,而是允许没有密码的 root 登录
选择哪一个版本?
generic 是一个经过修改的 Debian 版本,专门为在 PVE 中运行而优化。它包括 PVE 的特定工具和驱动程序,以确保在 PVE 中运行的虚拟机的性能和兼容性最大化。
genericcloud 镜像是一个更加通用的 Debian 版本,它包括云计算服务的工具和驱动程序,可能用于云计算环境。
在 PVE 中使用 Debian 系统,可以选择 generic。如果需要一个更加通用的 Debian 云镜像,则可以选择 genericcloud。
下载云镜像
下载镜像后,并使用命令行设置虚拟机参数。注:以下命令在 PVE 宿主机中执行
# 下载 Debian12 cloud qcow2 镜像文件
wget https://cloud.debian.org/images/cloud/bookworm/20240717-1811/debian-12-generic-amd64-20240717-1811.qcow2
# 或者下载最新版本
# wget https://cloud.debian.org/images/cloud/bookworm/latest/debian-12-generic-amd64.qcow2
# 定义虚拟机 id 为 9001
VM_ID=9001
# 创建 2 核 2G 的虚拟机
qm create $VM_ID --memory 2048 --core 2 --name debian12 --net0 virtio,bridge=vmbr0
# 导入下载的镜像,存储在 local-lvm / Drives
qm importdisk $VM_ID debian-12-generic-amd64-20240717-1811.qcow2 Drives
# 设置 scsi 控制器和磁盘
qm set $VM_ID --scsihw virtio-scsi-pci --scsi0 Drives:vm-$VM_ID-disk-0
# 磁盘设置为 30GB
qm resize ${VM_ID} scsi0 30G
# 添加 cloud-init 设备
qm set $VM_ID --ide0 Drives:cloudinit
# 设置引导
qm set $VM_ID --boot c --bootdisk scsi0
# 用 qemu 代理
# qm set ${VM_ID} --agent enabled=1
# 配置默认 cloud-init:自动获取 ip、root 用户密码、关闭首次自动升级
qm set $VM_ID --ipconfig0 ip=dhcp --ciuser "root" --cipassword "123456"
qm set $VM_ID --ciupgrade 0
设置系统
启动虚拟机,进行修改软件源、时区等操作。注:以下命令使用 VNC 连接虚拟机中执行
# 开启 root 用户使用密码连接 ssh( vnc 中无法粘贴,就手动修改以下两条)
sed -i 's/^#\?PermitRootLogin.*/PermitRootLogin yes/g' /etc/ssh/sshd_config
sed -i 's/^#\?PasswordAuthentication.*/PasswordAuthentication yes/g' /etc/ssh/sshd_config
# 重启 ssh 服务
service sshd restart
# 更换 apt 源为中科大源
sed -i 's/deb.debian.org/mirrors.ustc.edu.cn/g' /etc/apt/mirrors/debian.list
sed -i 's/deb.debian.org/mirrors.ustc.edu.cn/g' /etc/apt/mirrors/debian-security.list
# 更新软件
apt update
apt upgrade
# 设置时区为上海
timedatectl set-timezone Asia/Shanghai
# 清理 machine-id,若不清理,所有克隆的虚机会获取相同ip
cp -f /dev/null /etc/machine-id
# 清理历史命令
rm -rf ~/.bash_history && history -c
转为模板
注:以下命令在 PVE 宿主机中执行
# 将虚拟机设置成模版
qm template ${VM_ID}
使用模板

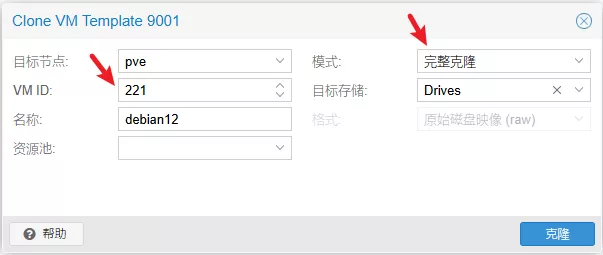
在 PVE 菜单选择上面的模板,右键在弹出的提示框选择“克隆”,修改对应的 VM ID,模式选择“完整克隆”
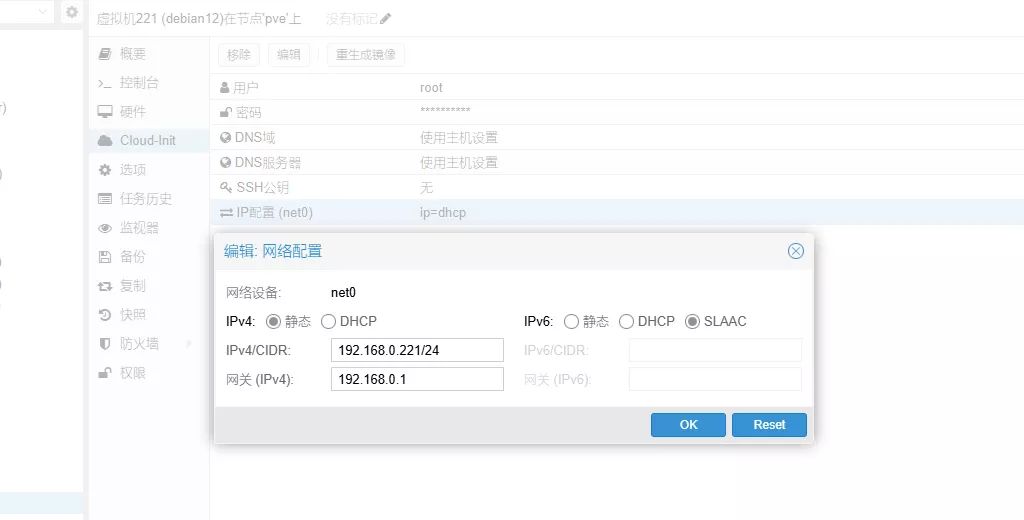
如果需要固定 IP,在虚拟机管理模板上,Cloud-Init - IP 配置,双击,弹出的对话框,可以设置成需要的固定格式,其中 IPv6 选择 SLAAC
以上,一台全新的虚拟机创建完成,可以普通 Linux 一样对它使用。